Have you ever tried to write something on your iPod Touch? Whether you’re a professional writer, like to just jot down lines of poetry when they come to you, or just want to send off a letter to your friend, there doesn’t seem to be a way to do it. Unless you visit the App Store, of course. The Notes app that comes as a default on the iPod Touch is great for things like grocery lists and maybe even the odd thing you need to remember. But when you need to really write, what are some writing apps for the iPod Touch that will help you do it? Here are the best 3!
Momento
Momento is an app that allows you to keep a mini journal on your iPod Touch. When you open the app, you’ll be given a list of all the days that you’ve written down an entry. And, just click on the pencil in the top right-hand corner and you’ll be able to enter anything you want. Memento is meant to be used like a mini Twitter for your iPod Touch, with casual observings or musings that you come up with during the day. And for that reason, it’s also linked to major social networking sites such as Twitter and Facebook so that you can easily upload and get your feeds, all from this nifty little app.
Postino
Snail mail is so yesterday. And that’s even true for postcards when you go on vacation. So don’t worry about scurrying around trying to find different postcards for all the different people back home. Download Postino and let it do all the hard work for you. With Postino, you can use pictures that you took yourself on vacation, so you can show all your friends your very favorite parts, and then you can email them all off, without ever leaving the beach!
WriteRoom
WriteRoom is an app that closely resembles that of the Notes app but is actually way better! Not only can you write in landscape mode but the keyboard is also much bigger too, making it even easier to type away. Plus, you can sync your documents with the desktop application and anything that you write in WriteRoom will be available over Wi-Fi. This third-party app might be the most expensive writing app that’s available for the iPod Touch, but it’s also probably the best!
http://www.applerepo.com/
iPod Hi-Fi: Frequently Asked Questions (FAQ)
Which iPod models support the iPod Hi-Fi?
iPod Hi-Fi is supports all iPod models (iPod sold separately). iPod models with a dock connector are supported via the integrated dock, while iPod models that do not have a dock connector need to be connected to the audio input port using a 3.5 mm stereo miniplug. iPod models connected through the dock have enhanced support for the remote. Newer iPod models, likeNote: Recent iPod models that do not support FireWire charging, such as the
Can I connect iPod Hi-Fi to my computer and use it as a dock?
iPod Hi-Fi does not have a USB or FireWire port to connect to a computer.How do I connect my iPod to the iPod Hi-Fi?
To connect an iPod with a dock connector insert the dock adapter that fits your iPod, and then connect your iPod. Your iPod Hi-Fi includes dock adapters that work with most models of iPod with dock connectors. If you want to connect another iPod, you can easily remove the dock adapter from your iPod Hi-Fi using a fingernail, insert the adapter that fits the other iPod, and then insert the other iPod. If there is no dock adapter for your model of iPod included with your iPod Hi-Fi, an adapter may have been included with your iPod or is available separately.See Learn about Apple Universal Dock to determine which iPod models are supported by each adapter.
When using on the go, how many batteries does iPod Hi-Fi require?
You can run iPod Hi-Fi off of AC power or from batteries. iPod Hi-Fi requires six D batteries when using on the go. Apple does not recommend using a combination of different types of batteries. For example, do not mix alkaline batteries with zinc carbon or rechargeable batteries.How do I insert my batteries into iPod Hi-Fi?
Insert the batteries positioning the positive (+) and negative (–) terminals on the batteries as shown below. All six batteries are not inserted the same direction. Instead the batteries are divided into two sets of three batteries.
Does the iPod Hi-Fi charge the iPod while running from batteries?
If you are using the iPod Hi-Fi with batteries (and not plugged into an electrical outlet) and you connect an iPod with a dock connector, the batteries in your iPod Hi-Fi provide a minimum charge to iPod. If the iPod is on, it charges for 30 minutes. If the iPod is asleep, it charges for 15 minutes. If you disconnect the iPod and reattach it, the charge cycle starts again. The best way to charge an iPod connected to the dock connector port is by connecting the iPod Hi-Fi to AC power.Note: You cannot disable the iPod Hi-Fi from charging an iPod connected to the dock connector (you can connect iPod to the audio input port and iPod Hi-Fi will not charge iPod, but you will not have access to some functions of the remote).
How can I get the most out of the battery life for my iPod Hi-Fi?
When not in use, your iPod Hi-Fi enters a low-power standby mode to save battery life. However, if you don’t plan to use your iPod Hi-Fi for an extended period, you may wish to remove the batteries to extend battery life even longer. See "Tips and Tricks to get the most out of your iPod Hi-Fi's batteries" for more information.Note: If you don’t want the batteries in your iPod Hi-Fi to expend power when iPod isn’t playing, remove iPod from your iPod Hi-Fi. If your iPod Hi-Fi is plugged into an electrical outlet, the iPod battery charges until it is fully charged.
Discharged batteries should be removed as soon as possible to avoid damage to iPod Hi-Fi from battery leakage.
How do I adjust the tone of the playback of iPod Hi-Fi?
With some newer models of iPod, you can also adjust the tone of playback from iPod Hi-Fi to suit a particular environment. Only the Fifth Generation iPod (iPod with video) andHow do I set my iPod so its backlighting stays on when connected to iPod Hi-Fi?
Only the Fifth Generation iPod and iPodHow do I set my iPod to show the album art when using with my iPod Hi-Fi?
You can also set whether you see the Now Playing screen or album artwork on iPod. You’re able to change these settings if you see a Speakers item in the main menu when you connect your iPod. To set your iPod to display full screen album artwork (when artwork is available for that song) select Speakers > Large Album Art so the setting is On.Can I use my iPod Hi-Fi to listen to audio from a different source?
Your iPod Hi-Fi has a digital/analog audio input port. You can use it to play music from an iPod that doesn’t have a dock connector or from other audio devices, such as a CD player, stereo receiver, or computer. If you have an AirPort Express Base Station, you can connect it to iPod Hi-Fi and play music from a computer in another room using AirTunes. You connect audio devices or an older iPod using an audio cable with a standard 3.5 mm stereo miniplug. For higher-quality sound, you can connect an optical digital audio device using an S/PDIF optical digital audio cable with a Mini-Toslink connector.How do I switch playback from an iPod to a device connected to the audio input port?
If you have an iPod connected to the dock connector port and a different audio device connected to the audio input port you can select between the playback of these two devices by press and holding the Menu button on the remote.What does the status light mean?
| Status Light and Action | Indicates | |
| Status light displays green for two seconds when inserting iPod | When the iPod Hi-Fi recognizes that an iPod that has a dock connector was inserted into its dock connector port | |
| Status light blinks green once when you press a button on the remote | Indicates that the iPod Hi-Fi received and can perform that function | |
| Status light blinks amber once when you press a button on remote. |
| |
| Status light blinks green (for up to one minute) |
| |
| Status light blinks green after pressing Menu button on remote | iPod Hi-Fi changes playback between iPod and audio input port | |
| Status light blinks amber after pressing Menu button on remote | iPod Hi-Fi cannot change playback between iPod and audio input port, because it only recognizes one source present | |
| Status light blinks green three times while pressing Menu and Next/Fast Forward | Pairing remote with iPod Hi-Fi | |
| Status light blinks green three times while pressing Menu and Previous/Rewind | Reset (unpair) remote with iPod Hi-Fi | |
| Status light displays green for two seconds when you connect the AC power cord | iPod Hi-Fi is receiving power from AC power | |
| Status light displays green for two seconds when you remove AC power and have good batteries | iPod Hi-Fi is receiving power from the batteries | |
| Status light displays amber continuously when you remove AC power, but eventually stops | iPod Hi-Fi is not receiving power from the batteries or there are no batteries | |
Can I use the iPod Hi-Fi while traveling?
The iPod Hi-Fi has an auto-switching power supply. Because of this it can accept a range in both voltage and frequency, and only require a plug adapter for the specific locale. It supports 100 V to 240 V, 50 Hz to 60 Hz.How do I pair the remote so it only works with my iPod Hi-Fi?
See "Using the Apple Remote with iPod Hi-Fi" for steps to pair the Apple Remote with iPod Hi-Fi.Where is the serial number located on my iPod Hi-Fi?
The serial number is printed on the inside of the battery compartment of your iPod Hi-Fi. See "iPod Hi-Fi: Locating the serial number" for more information.Does the battery indicator on an iPod connected to the iPod Hi-Fi's dock connector reflect the charge level of the six D-size batteries installed in the iPod Hi-Fi?
No, the iPod's battery indicator reflects the charge level of the iPod's internal battery.http://support.apple.com
How to Play Your iPod Touch in your Car
Don’t ya just love your iPod Touch? With thousands of songs and video, not to mention all the iphone apps and podcasts, what’s there not to love about the Touch? Well, it does have one inherent flaw that, even if you jailbreak it, you won’t be able to do. And that’s listen to your iPod Touch in your car. Sure, you can listen to it anywhere else but, put those headphones on in your car, and you have a serious safety issue. While the situation may seem hopeless, and you may think that you’re destined to onlylisten to your car radio, there are a few things you can do. Here are some simple solutions for listening to your iPod Touch in your car.
Cassette Player
If you have an old tape deck in your car, you can use this to play your iPod Touch in your car. There are tapes cassettes available that are made especially for playing your iPod in your car. It’s a simple tape that has an audio cord attached to it. This cord comes out of the cassette and attaches to the iPod while it’s playing. The cassette player then reads the audio signal from the iPod instead of from the reel of tape that’s in the cassette. These are fairly cheap and can be picked up for about $10. You’ll lose a little bit of sound quality, but will be able tolisten to all of your favorite songs! The downside? Your iPod will not charge while listening to it.
FM Transmitters
If you want to be able to charge your iPod Touch while you listen to it, you might be better off with an FM transmitters. These cost around $30 and will charge your iPod while you listen to it. These transmitters simply plug into your iPod and then plug into your car’s cigarette lighter or electrical outlet. Simply set it to the FM station the instructions indicate and voila! You’ll be listening and charging youriPod Touch in your car in no time!
Aux-in Connector
These connectors can cost you anywhere from $75 to $100. These are special cords that are made to fit into more modern cars that have been designed with a special outlet for aniPod . One end plugs into your Touch and one plugs into the outlet that has been made specially on the radio console. If you don’t have a modern car, there are many car stereo systems that can be installed yourself, and that will have this outlet available on them.
Car Stereo for iPod
These are different from the Aux-in connectors because they are stereos that have been designed to hold an iPod. These are also your most expensive option as they usually cost more than $300. But it will also do everything that you need it to do. It will play your iPod beautifully, you’ll lose no sound quality, and it will charge your iPod while youlisten to it. The downside? They’re also uber-expensive!
http://www.applerepo.com/
Pick the perfect view options in iTunes
When you want to examine your iTunes library, you have a choice of different views—ways to display the content. You can choose a different view for each part of your iTunes library, whether it be for the sub-libraries (such as Music, Movies, TV Shows, or Audiobooks) or for playlists, and iTunes remembers these views for each part of its display. Here’s a look at the three different views, when you might want to use them, and which options each one offers.
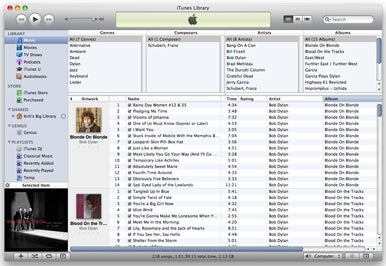
List view You can display additional columns by choosing View -> View Options and checking the columns you want to see, or by Control-clicking on any column header and choosing a column from the contextual menu. Each of these columns contains tag information that was either included with music you purchased, downloaded from the Gracenote database when you ripped CDs, or that you added manually. You may want to display other columns, such as Year, BPM, or composer (for music), or other specific columns for other types of content. You can then drag the columns to reorder them as you prefer.
You can sort your music by the information in any of these columns by clicking in the column headers—for example, the Date Added column to see the items you’ve most recently added to your library—and if you click the Album column it toggles between Album, Album By Artist, and Album By Year.
In List view you can also display a browser (View -> Show Column Browser), and can choose to have it show at the top or the side of your list as well as choose which columns it displays. The browser lets you narrow down what iTunes displays. For example, if you want to see only your jazz tracks, click Jazz in the Genres section of the browser; you can then see those artists who are only in that genre, and see all their music by clicking one of their names.
List view is the default view for any playlists you make, but you can choose one of the other two views by clicking the View button, or using one of the View menu items.
Grid view is good if you want to see an overview of your content. Each grouping shows as one icon, so if you have a single track from an album and an entire album, each will show as one icon. The same is true for audiobooks, TV shows, and podcasts; if you have one or more chapter/part/episode, each group will have its own icon.
Grid view You can sort your Grid view content by choosing View -> Grid View, then choosing Albums, Artists, Genres or Composers; iTunes will sort according to those tags. (Those choices are for music; choices are different for other types of content.) If you choose to sort by, say, Artist, all items by one artist will be hidden beneath a single icon; drag your cursor over that icon to see different items.
You can also display a header by choosing View -> Grid View -> Show Header, which provides a button bar where you can choose sort criteria, and a slider you can use to change the size of the icons.
With Grid view, you can play items easily. Just move your cursor over an icon and click Play content type when that label displays. You can’t stop playback the same way, though; you’ll have to click the Pause button at the top-left of the iTunes window.
When you double-click an item in Grid view, iTunes goes “into” that item, and opens its contents in a List view window. You can explore the tracks that display, or play them, and to return to Grid view, click All Albums, at the top left of the Grid view header.
iPhone . Cover Flow shows items’ artwork against a black background in the top part of the iTunes window, with a list section below it. You can change the size of the icons by dragging the horizontal separator between the scroll bar and the list headers. You can scroll horizontally through your content or click a cover that you see. Whether you scroll or click, iTunes moves the list to display whichever item is front and center (with the item’s name below it).

You can go into a full-screen mode by clicking the square icon with arrows pointing away from each other on the diagonal at the right of the Cover Flow section. When in this mode, you can start and pause playback, change volume, and scroll through albums and other types of content in other libraries with nothing on your screen other than the artwork in Cover Flow against a black background.
For music, depending on the size of your library and the number of albums, any of them can work, but if you’re sorting or searching for music, List view is most practical. Grid view is good if you’re visual; if you like to choose what music to play by looking at album art. Some people like Cover Flow view, because you can “flip through” your music easily, but I find that with a large library it can be unwieldy.
Remember that you can change views whenever you want, and you can apply different views to each part of your iTunes library, and to each individual playlist. So try them all out and see which is best for your needs.
http://www.macworld.com
List view
The first of the three views available is List view. This is the best way to see detailed information about your music and other content, because each track or item displays on its own line with a number of columns of information about it. To enter List view, click the leftmost part of the triple View button (located at the top of the iTunes window, to the left of the Search field), or press Command-Option-3. By default, List view displays only a few columns for music: Name, Time, Artist, Album, Genre, Rating, and Play count. (Other columns display for movies, TV shows, audiobooks, or podcasts.)List view
You can sort your music by the information in any of these columns by clicking in the column headers—for example, the Date Added column to see the items you’ve most recently added to your library—and if you click the Album column it toggles between Album, Album By Artist, and Album By Year.
In List view you can also display a browser (View -> Show Column Browser), and can choose to have it show at the top or the side of your list as well as choose which columns it displays. The browser lets you narrow down what iTunes displays. For example, if you want to see only your jazz tracks, click Jazz in the Genres section of the browser; you can then see those artists who are only in that genre, and see all their music by clicking one of their names.
List view is the default view for any playlists you make, but you can choose one of the other two views by clicking the View button, or using one of the View menu items.
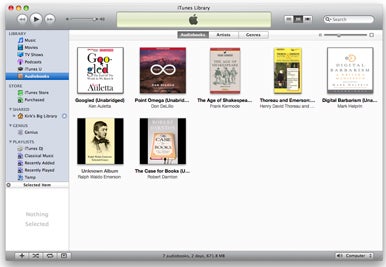
Grid view
Grid view is the default for the different iTunes libraries: Music, Movies, TV Shows, Podcasts, Audiobooks, and iTunes U. If you’ve never launched iTunes before, or if you’ve never changed views, this is what you’ll see in each of those libraries. Unlike List view, where you see a lot of text, Grid view shows big icons of each item (album, movie, podcast, and so on) on a plain background. (By default, this is a white background, but you can change it to black. Choose iTunes -> Preferences, then, from the Grid View pop-up menu, change Light to Dark.)Grid view is good if you want to see an overview of your content. Each grouping shows as one icon, so if you have a single track from an album and an entire album, each will show as one icon. The same is true for audiobooks, TV shows, and podcasts; if you have one or more chapter/part/episode, each group will have its own icon.
Grid view
You can also display a header by choosing View -> Grid View -> Show Header, which provides a button bar where you can choose sort criteria, and a slider you can use to change the size of the icons.
With Grid view, you can play items easily. Just move your cursor over an icon and click Play content type when that label displays. You can’t stop playback the same way, though; you’ll have to click the Pause button at the top-left of the iTunes window.
When you double-click an item in Grid view, iTunes goes “into” that item, and opens its contents in a List view window. You can explore the tracks that display, or play them, and to return to Grid view, click All Albums, at the top left of the Grid view header.
Cover Flow view
The third view in iTunes is Cover Flow, which you might be familiar with from the Finder or from your iPod orCover Flow view
Choosing the right view
Depending on which type of content you’re looking at, you may want to use a different view. For movies and audiobooks, Grid view is great, because items in these libraries usually don’t contain many files. A movie as a Grid view icon is easier to see than in, say, List view, and for audiobooks, each Grid view icon hides the multiple files for a book.For music, depending on the size of your library and the number of albums, any of them can work, but if you’re sorting or searching for music, List view is most practical. Grid view is good if you’re visual; if you like to choose what music to play by looking at album art. Some people like Cover Flow view, because you can “flip through” your music easily, but I find that with a large library it can be unwieldy.
Remember that you can change views whenever you want, and you can apply different views to each part of your iTunes library, and to each individual playlist. So try them all out and see which is best for your needs.
http://www.macworld.com
TUNEWALLET iPod Touch cases

Tunewear has introduced a new set of iPod Touch cases called the TUNEWALLET. TUNEWALLET is a wallet-style case featuring a horizontal flip-open design and accented with a colorful elastic band. iPod touch tucks securely inside and there are two card holder slots for your credit card, driver�s license, IC card or cash. Read more...
The TUNEWALLET iPod Touch cases feature dual interior card slots, one with a quick release hole, open access to all ports and controls, an included screen protector and cleaning cloth.
The quick release hole in the card holder slot helps you to take out the card you use most often. When you are done, close TUNEWALLET back up and keep it tucked away in your bag or pocket. The elastic band will keep it from popping open and the TUNEWALLET cover will protect iPod touch from getting scratched by loose items in your bag or pocket. These cases are available for $24.95.
http://appleipodtouch.blogspot.com
Download iPod Touch Firmware 3.1.3

The new iPhone firmware 3.1.3 is now available for iPod Touch and iPhone, the firmware comes with various bug fixes like app launching problems, apps crashing etc, if you are on jailbroken iPod Touch/iPhone, you will have to jailbreak again with the corresponding jailbreak tools.

Download Firmware 3.1.3 for iPod Touch
iPod Touch 2G filename: iPod2,1_3.1.3_7E18_Restore.ipsw
iPod Touch 3G filename: iPod3,1_3.1.3_7E18_Restore.ipsw
iPod Touch 1G filename: iPod1,1_3.1.3_7E18_Restore.ipsw
The links may not remain alive forever so download as soon as possible.
Recommended Reading
- Download iPod Touch 1G/2G/3G Firmware OS 3.1.2Apple has recently released new firmware version 3.1.2 for iPod Touch, the new version fixes most of the bugs that were prevalent in the previous...
- Upgrade to iPod Touch OS 3.1.1 for Free [Download OS 3.1.1 IPSW]Currently Apple is charging $4.95 if you want to upgrade to latest firmware OS 3.1.1, so like our previous posts on iPod Touch 1G/2G free..
Keyboard Tips for the iPod Touch

Start by going to the Settings icon on the iPod Touch Home screen and tap on it. Then select “General.” Find “Keyboard” towards the bottom of the list, tap on it, and you’ll be given a wide variety of options.
The “Auto-Correction” feature is turned “On” by default and will automatically correct commonly misspelled words, such as the spell check in Microsoft Word does. However, this can become irritating if you use a lot of slang so many people like to turn it off. “Auto Capitalization” is much like Auto-Correction but it will insert a capital letter in place of a small letter when it feels necessary. Again, it today’s world of texting and computer lingo, this can be frustrating so it’s one people commonly customize and turn off.
“Enable Caps Lock” does just that and is only useful if you plan on typing a lot of text in capital letters. It comes in the “Off” position by default. The “Shortcut” feature onthe iPod Touch keyboard is a pretty nifty little one. Instead of always adding a period at the end of your sentence, you can just space a couple of times and thekeyboard will automatically add it in. This default comes in the “On” position because, how cool is that?
The last option is the International Keyboard and it will supply you with a list of countries with associated languages that you may need to type in. All of these will be listed as “Off”, except for the country’s language of your choice.
http://www.applerepo.com
Syncing music to iPod or iPhone
Summary
iTunes includes several options to automatically or manually sync music to your iPhone, iPod, iPod classic, iPod nano, iPod shuffle (3rd generation), iPod mini or iPod touch. If you are using an iPod shuffle, learn how to sync music to it in this article.Products Affected
iPod nano, iPod mini, iPod, iPhone, iPod touch, iPod classic, iPod shuffle (3rd generation)Syncing music and podcasts automatically
- Connect iPod or iPhone to your computer and open iTunes.
- Select your iPod or iPhone in the Devices section on the left side of the iTunes window.

- In the main iTunes browser window, select the Music tab.
- Select the option to Sync Music.

- You have the option to sync all songs and playlists or selected playlists. Your iPod will need to have enough free space to sync the content that you have selected from your library. Tip: You can use the capacity bar at the bottom of the iPod settings window to determine how much free space is available. The size of a playlist can be determined by selecting it and looking at the bottom of the iTunes window.

- You can also automatically sync podcasts to your device. Select the Podcasts tab and choose to sync all podcasts or selected ones. You can also determine which episodes are synced based on if they are recent, new, or unplayed.

- Click Apply and iTunes will begin syncing the audio content you've selected to your iPod or iPhone. The iTunes LCD will display the sync progress and notify you when the sync is complete.


- To disconnect your iPod or iPhone, select it under Devices and click the eject icon next to it.
Syncing music manually
If you prefer not to automatically sync music content to your iPod or iPhone, you can set up manual syncing.- Connect your device to your computer and open iTunes.
- Select your iPod or iPhone in the Devices section on the left side of the iTunes window.

- In the main iTunes browser window, select the Summary tab.
- Select the option to "Manually manage music and videos" or "Manually manage music." This will deselect the automatic sync settings for the Music, Movies, and TV Shows tabs. Automatic syncing for Podcasts, Photos, Contacts, and Games can be individually disabled by selecting those options in each of those tabs. Note: When manually managing iPod, disk use is enabled and iPod must always be manually ejected in iTunes before disconnecting it from your computer.

- Click Apply.
- To manually add music, audiobooks, movies or TV shows, choose one of these categories under Library on the top-left of the iTunes window.
- Select and drag items you want (to choose multiple items, Command-click items on a Mac or Control-click items in Windows), then drag them onto your iPod or iPhone icon under Devices.
- To add a playlist, select it from the left side of the iTunes window and drag it onto your device in the same way.

- When you are ready to disconnect your iPod, select it under Devices and click the eject icon next to it.
Syncing music with Autofill
When the "Manually manage" option is enabled, you can use Autofill to quickly sync audio content from your music library or a selected playlist. Autofill settings allow you to adjust how songs are selected for syncing as well as allocate space for disk use. To use Autofill, make sure your iPod is set to manually manage music using steps 1-5 above and then follow the steps below.- Select iPod or iPhone in the Devices section on the left side of the iTunes window.
- Click the disclosure triangle next to the iPod or iPhone icon to reveal the contents of the device.

- Select the Music library and review the Autofill settings at the bottom of the main iTunes window.

- When you click the Autofill button, iTunes will automatically sync as much music as possible to your iPod. If the playlist you selected contains more music than your device can hold, Autofill will sync a subset of the music. The iTunes LCD will display the sync progress and notify you when the sync is complete.
- Disconnect your iPod or iPhone by selecting it under Devices and clicking the eject icon next to it. Then, disconnect the USB cable.http://support.apple.com/kb/HT1351
iPod: How to find the serial number
Summary
This article describes ways to find your iPod serial number. The content of this document also applies to iPod shuffle; however, see iPod shuffle: How to find the serial number for information on how to locate iPod shuffle's serial number on the device.Products Affected
iPod nano, iPod shuffle, iPod mini, iPod, iTunes, iPod classic, iPod touch There are several places where you'll find your iPod serial number:

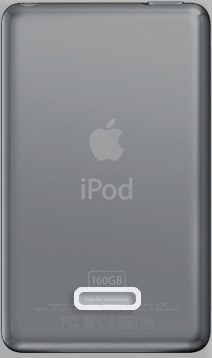

The picture above shows where the serial number is located on the back of an iPod and iPod nano.
If you have an iPod shuffle, the serial number is located on the back of the iPod behind the clip.
http://support.apple.com/kb/HT1459
- In iTunes
- On the back of your iPod
- In the iPod About screen
- On your iPod packaging
- On your iPod invoice or receipt
iTunes
- Connect iPod to your computer.
- When iPod appears in iTunes, select it on the left side of the iTunes window under Devices.
- Click the Summary tab, and your iPod's serial number will display on screen. For iPod shuffle (1st and 2nd generation), click the Settings tab.
- Hold down the Control key and choose Help > About iTunes (Windows) or iTunes > About iTunes (Mac).
- Release the Control key.
- As the iTunes and QuickTime version information scrolls, you will see the serial number of the last connected iPod as well as the last connected iPhone's serial number and IMEI.
Tips:
Note: In iTunes, when you view the iPod serial number, you can choose Edit > Copy to put the serial number on the Clipboard. You can then paste the serial number into an email or web page (for registration, for example).- Hold down the Option key (Shift key in Windows) to reverse the scrolling.
- Press the Space bar to pause the scrolling.
- You can copy this information to the Clipboard and and paste it into a document.
In Mac OS X, choose Edit > Copy (or Command-C).
In Windows, press Control-C.
On the back of your iPod
If you have an iPod, iPod mini, iPod nano, iPod classic, or iPod touch, the serial number is engraved on the back metal case toward the bottom. The picture above shows where the serial number is located on the back of an iPod and iPod nano.
If you have an iPod shuffle, the serial number is located on the back of the iPod behind the clip.
In the iPod About screen
You can find your serial number in the About screen on your iPod:- iPod touch: Choose Settings > General > About.
- iPod classic: Choose Settings > About and press the Center button until you see the serial number.
- Other iPod models: Choose Settings > About.
On your iPod packaging
If you still have the original packaging for your iPod, you can find your iPod serial number printed on the barcode label that's affixed to the packaging.On your iPod invoice or receipt
Your product invoice or receipt may list your iPod serial number.http://support.apple.com/kb/HT1459
Find My iPhone now accessible from iPhone, iPod touch

Apple has launched a redesigned version of its Me.com splash page for the iPhone and iPod touch, adding new download links for its MobileMe iDisk and Gallery applications, as well as access to the Find My iPhone feature. Previously, the page contained only one link, providing setup instructions for setting up Mail, Contacts, Calendars, and Find my iPhone on an iPhone/iPod touch; the new page retains this link, but adds the others mentioned above. Following the Find My iPhone link prompts the user to enter his or her MobileMe username and password, and then takes them to a frame-less version of the Find My iPhone page, complete with location map and links to send a text and/or audio alert, or remotely lock/wipe the device. An Apple support document suggests accessing the service “from a friend’s iPhone/iPod touch if you need to locate your lost iPhone/iPod on a map, display a message, play a sound, or remotely lock or wipe it.”
http://www.ilounge.com


